
Disclaimer: The following tutorial was written by Justin Reed (NV8Q) and is provided without warranty or support. I do not have official involvement with the MTR2K boards other than I own and use several. This guide assumes you are already familiar with writing an image to an SD card and configuring Pi-Star in a hotspot or STM32-based repeater. If this is your first rodeo with Pi-Star or MMDVM, this guide will not hold your hand through the simple stuff.
Due to popular demand, I’ve finally gotten around to writing a short configuration guide for using Pi-Star on the STM32-DVM-MTR2K board. This guide covers all variants of the board.
First, download the Pi-Star image for the NanoPi here: http://www.pistar.uk/downloads/
Note: Be sure to get the NanoPi image and not the NanoPi_Air version.
Once that file is downloaded, unzip it using your favorite unzip software. This will produce the original file in .img format.
Then, using a quality micro SD card (class 6 or faster) at least 4MB in size, download and use Win32DiskImager (or your favorite disk imaging program) to write the image to the card. Insert this card into the NanoPi Neo, slide the STM32-DVM-MTR2K into the middle slot of your MTR2000 station, connect the Ethernet port to your network and power up the station. (Antenna/dummy load connected to the TX, right?)
At this point, it needs to be pointed out that the OS that Pi-Star is built upon requires a connection to a network that has a DHCP server running or it will block and not fully boot. You don’t necessarily need to be on a network connected to the internet but at a minimum the Pi will need a link to a network with DHCP enabled. If your repeater is going to be used as stand-alone with zero network attached, you will want to use the MMDVM software that Cort includes with the MTR2K boards. Alternately, you can just buy a cheap router and enable DHCP and Pi-Star will work standalone.
Once you’ve powered up the station and waited a minute or so for the software to load, using a web browser on another computer connected to the same switch/router the station is connected to, browse to http://pi-star.local/ and enter the default credentials. Be sure to change your password at first opportunity.
Since our primary (or only) mode of operation in the KS-DMR system is DMR, and DMR is the most level-critical mode, that’s what our config and alignment will focus on.
After you’ve completed the basic configuration, click into the Expert > MMDVMhost window. Scroll down to the ‘Modem’ stanza which will look similar to this:
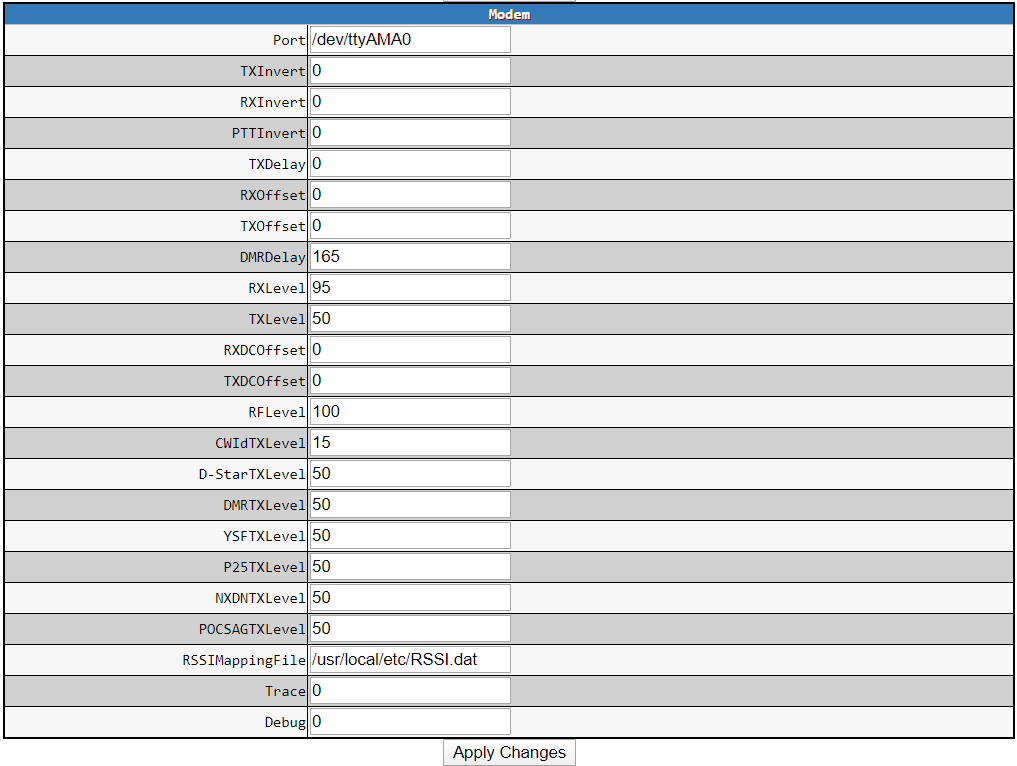
Be sure that TXInvert and RXInvert are set to 0 (zero), and DMRDelay is set to 165. The other fields are not critical other than I suggest your levels are around 50. The actual level alignment will be completed in the MTR2000 RSS. Apply the changes after you’ve written new values.
Once that is done, click here to learn how to align the levels on the MTR2000 station.
After you complete the alignment you should have a working MMDVM repeater. This really leaves us with just one other piece: RSSI. This is by no means mandatory, but a lot of folks like to use the RSSI feature in MMDVM. The modem stanza within MMDVMhost allows you to specify a location for a mapping file to hold the measured value of the MMDVM RSSI ADC input, and the corresponding signal level in dBm. The file can be directly edited via the http interface in Pi-Star by browsing to the Expert > RSSI Dat page. Not everyone has the means to calibrate RSSI, so I wanted to offer my RSSI.dat from a typical MTR2000 equipped with a V2.0 board. Please understand that you’ll want to do a calibration for each radio for maximum accuracy. If you don’t have the means to do this, or absolute accuracy isn’t that important to you, the numbers below should get you pretty close:

The STM32-DVM-MTR2K will saturate the MMDVM ADC input at signals much stronger than -30dBm. That’s ok, I did that on purpose in order to keep the signal level at the low end up a little higher in order to improve ADC resolution for weaker signals.
8 comments on “Configuring Pi-Star for the STM32-DVM-MTR2K”
Robert W Conklin
March 31, 2020 at 10:28 pmMy board has the NanoPi Neo installed, In the Pi-Star configuration menu, which Radio/Modem type should be chosen.
nv8q
April 4, 2020 at 11:19 amSTM32-DVM/MMDVM_HS – Raspberry Pi Hat (GPIO)
Rob P.
May 16, 2020 at 10:13 pmNice article! I just wish I could get the RSSI part to work. No matter what I do, I cannot get the RSSI field in the pi-star dashboard to register *anything*, ever! I’ve tried many different RSSI.dat file formats (spaces vs. tabs, etc.). Nothing I’ve done will make it show anything. It’s always blank. Even bad/inaccurate values would be an improvement! I’m running the latest pi-star v 4.1.1 on a Raspberry Pi 3 B+ with a Zum Radio Modem board interfaced to a couple of Motorola CDM 1550LS mobile transceivers as a duplex repeater. I brought the RSSI signal line out from the receiver and in to the Zum board as well. Any ideas? I’m obviously missing something. Thanks for your time.
nv8q
May 17, 2020 at 9:42 pmRob,
Your issue has nothing to do with the product described. We’re referencing the STM32-DVM-MTR2K board used in the MTR2000 repeater. It’s plug-n-play. There is no way we could know what you might have done wrong, or what may be wrong with your ZUM/CDM1550LS setup.
Justin
NV8Q
Rob
May 18, 2020 at 4:29 pmOh, my bad… so you’re not using pi-star then??? Could have sworn we’re using the same software, “product” called pi-star, which works with more than just the STM32-DVM-MTR2K board. I just happen to be using the Zum variant, which is just another flavor of MMDVM board. The hope was that you’re more familiar with pi-star than me, and that you could provide some insights. Oh well, thanks anyway…
nv8q
May 19, 2020 at 9:17 amThe STM32-DVM-MTR2K is the product being supported by us. It ships to the customer with “vanilla” MMDVMhost installed in a default configuration. I wrote the “how-to” article for using Pi-Star on the STM32-DVM-MTR2K because it saves getting thousands of e-mails asking how to do that. I literally don’t know anything about your hardware because I’ve never used any of it, never owned a “hotspot”, and never will.
If you have created an RSSI.dat file formatted as shown above, and you are referencing that file correctly in the RSSIMappingFile field within the modem page (as shown above) then it JUST WORKS, unless you have a wiring, hardware, or firmware issue.
If you need further assistance with Pi-Star, there is an ENTIRE FORUM full of help here: https://forum.pistar.uk/
Cort Buffington
May 19, 2020 at 11:23 amThat still doesn’t make us a generalized pi-star support forum. It is inappropriate to use the comments section of an article to try and elicit technical support, even if it is regarding the configuration described in the article, much less that the article happens to mention one piece of software that you’re having trouble with in a completely different context.
Please look for an actual pi-star support forum.
Gordon Kelly MM3XGP
August 24, 2021 at 5:32 amthis has to be one of the best infomation sites out there that actualy sells a product and has a very detailed how to database for users who have purchased this board i think the advice and how to`s are all done in simple terms and for a newbie to the motorola mtr2000 and using this board it is the must have site
Many thanks Guys keep up the great work you do